 So painting is a pretty massive part of this hobby everyone would agree, but you cant really talk shop in regards to painting on a podcast. It just doesn't work without the visual aspect for obvious reasons (other podcasts have tried and failed however). But because we didn't want to ignore what is a pretty fundamental aspect of Infinity we decided to put painting articles up here independent from the podcast episodes themselves. Secondly, because any tips we could give would be mediocre at best we drafted in one of Australia's best painters Yoshi to do the guest articles.
 You can find his work over at http://yoshinto74.blogspot.com.au/ So go check it out! (incidentally he's also the guy who painted the Achilles for our competition prize, so you should all get onto that as well)
Painting Tutorial #1 Blending - By Yoshi
I wanted to give an example of how to manage the blending technique that may offer
you some ideas how to practise it effectively. I thought I would begin though to look
at the work area and tools for painting and offer advice for those just beginning to
paint.
First you need an area where you can store all your materials and in a space where
you can relax for long periods of time when painting. Try and keep you work area
clean and dust free if possible as this will ensure a clean area to paint in.

If you are considering a very good light source for painting then I would recommend
a Ionmax lamp that is a god send to the way I paint miniatures or for any other art
work. Don’t ask me what it does different but it must have ion particles in the bulb
or something that generates more light that seems more natural. I also have a room
that is filled with natural light from outside which is a big help but not crucial as the
Ionlamp works perfectly at night time. And a good comfy chair is really important to
keeping your posture as you will be spending a lot of time in one position.


thin sponge, baking paper and water. I prefer to use the paper sold as bulk sheets from
Privateer press as they are a specifically made and have no oily residue as the baking
paper does.

invest in some red sable brushes from your local art store or local game store. I find
the bran Raphael or the Winsor Newton brands are held in high regard but are very
costly. You can find a happy medium in a red sable brush if you look around in your
local art shop. Try and get a size #1 and #2 brush and if you have an old brush lying
around then that would come in handy for mixing you paint on your palette.

majority of my painting life without one, but it is a great tool when undercoating and
base coating your miniatures. You can pick up a simple airbrush kit from your local
game store of hobby centre.

If you have access to an airbrush then I must recommend the undercoat paint from the
Vallejo range which is formulated for miniatures and the airbrush. If you don’t have
access to an airbrush then the trusty aerosol is a perfect equivalent. I prefer to use a
light grey instead of black or white but it is up to your personal preference as to which
undercoat colour suits your painting style and project.

With your miniature, I prefer to use a cork base to hold it when undercoating and
painting but if you prefer to blue tac your mini to a paint pot that is perfect too.
painting but if you prefer to blue tac your mini to a paint pot that is perfect too.


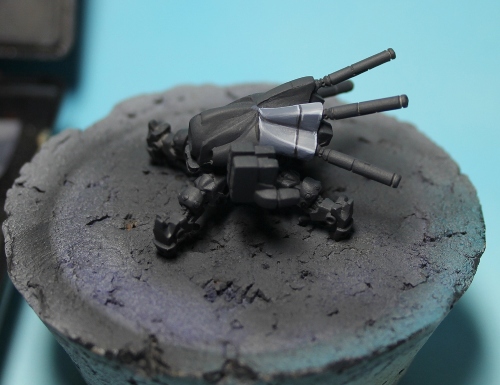
Now for the miniature I am painting today I have used a light grey undercoat that was
airbrushed on and followed with a German grey undercoat form the Vallejo range of
airbrush paints.
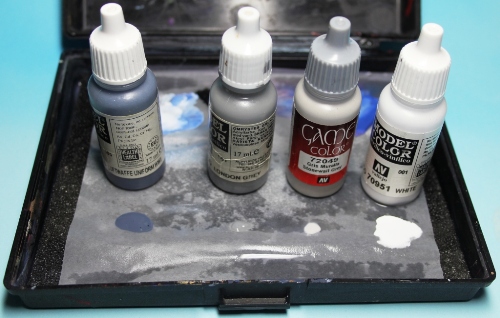
These are the paints I will be using for the tutorial and they are all of the Vallejo
brand and are pictured for your reference. Please feel free to use other paint range
equivalents to the ones I am using.
airbrushed on and followed with a German grey undercoat form the Vallejo range of
airbrush paints.
These are the paints I will be using for the tutorial and they are all of the Vallejo
brand and are pictured for your reference. Please feel free to use other paint range
equivalents to the ones I am using.

This is what they look like on the palette.
Always shake your paints well to get the pigment mixed thoroughly through before
applying the paint to the palette. Next mix a small patch of the Luftwaffe grey as this
will be the first colour we will use to apply to the remotes canopy section.

Then with your #2 brush we want to apply a thinned out layer of the dark grey to the
panel section we are painting. The paint consistency should be not be watery but not
too thick. The wet palette works very well with keeping your paint wet and reusable
during drying times.

Depending on the paint consistency you may wish to add another layer of the
Luftwaffe grey if needed so that it is completely covering the section of panel. Now
we want to mix in some of the London grey to the Luftwaffe grey to create a mid tone.

Now there is not a huge visible difference between the two shades but we are building
the layers progressively. Keep the lighter layers of mid tone on the raised areas of the
model and leave the sides and underneath dark. Now apply another coat of this mid
tone if needed. We can now apply a pure London grey highlight to the raised areas of
the panels. Keep this layer light and not too heavy with paint as we only wish to use
light layers to build up the highlights gradually.


London grey to help define the contours of the remote. Add some of the Stonewall
grey if you need an even lighter tone to do this highlight.

You can use some of the Luftwaffe grey or black or a mix of the two to add a thin
line to define the armour plates which is separated by the moulded groove. You can
do this with a thinner brush if needed and this is sometimes challenging to painters to
achieve a straight even line, but practise makes perfect, so have a go.
Next we will add some white to the mix and define the plates even further to make
them really pop.


And now you should have a well defined section to your miniature. Add more white
to the corners if you need to emphasise the angles. This is an easy way to minimise
blending and to create definition to your models. I will now go and make further
blends to the panels using a range of tones in the mix I have made to smooth out the
layers.
This was achieved by feathering the mid tones of grey starting from the top ridge at
the back of the armour plates and working my way down and blending it through
to the darker grey underneath. This is a more technical technique and I would just
concentrate on the above method for now, but please feel free to experiment with
the blending to help improve your technique and understanding of how it can be
achieved.
Please feel free to contact me for feedback in relation to this tutorial as I am a
beginner to this myself and need some guidance in making them more effective for
you all.
Thank you and happy painting.
Yoshi
Yoshi's Painting Blog
That's an excellent tutorial. Very concrete. Thanks for writing it.
ReplyDeleteCheers Bladerunner I am glad you can take something from my tutorial that is very encouraging mate :) If there are any questions or feedback then please let me know :) Cheers
DeleteI love the step by step look. Cant wait for more.
ReplyDeleteyeh me either! I actually went out and bought a couple more mid shade greys today because of this...stupid yoshi making me spend cash.. and as for more you'll have to talk to Yoshi since I told him to "do as many as he likes and give them to me whenever he damn well pleases" lol
ReplyDeleteWhy Noakesy...you crack that monofilament whip on him until he is done lol. As I been looking for a tutorial for painting Infinity Models. Thirsty for more.
Delete